EMPATHY WORKSHOP
The empathy workshop was divided into multiple sections to help us understand what it may feel like living with a disability or something that may restrict our movement, vision, or anything else that we may take for granted.
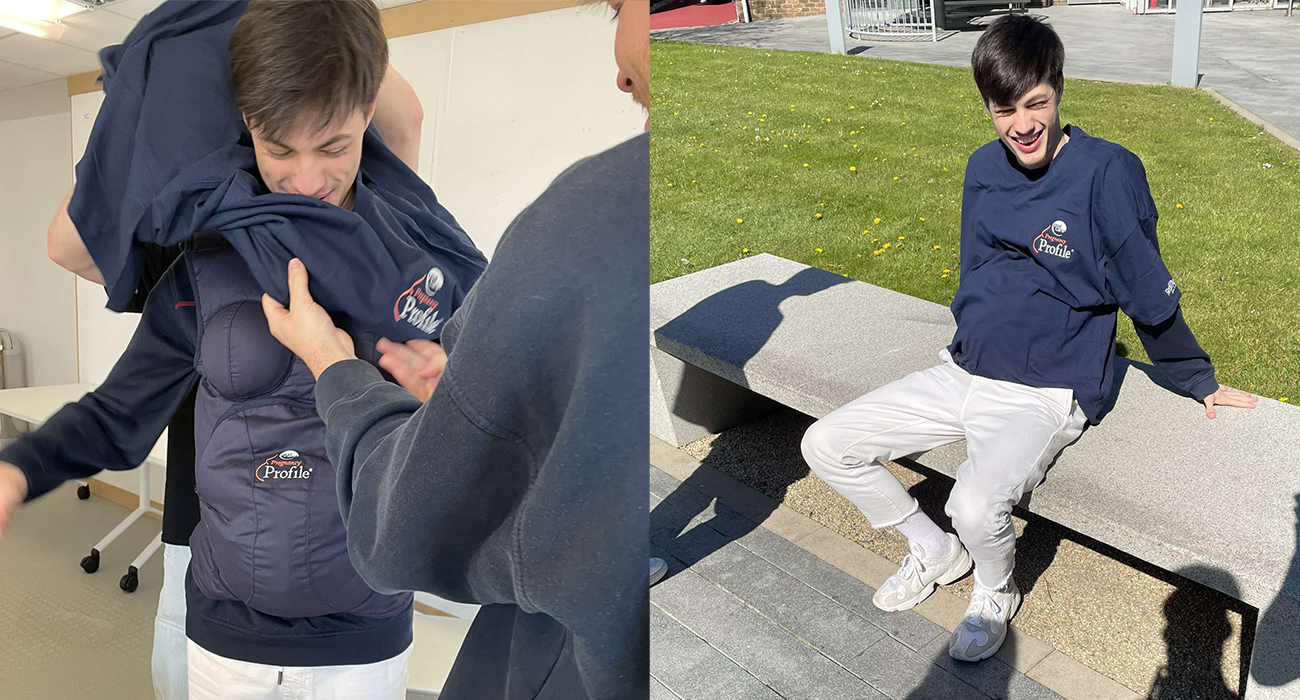
The first stage of the empathy workshop was related to pregnancy and arthritis (these factors being mutually exclusive). I tried on the pregnancy suit and walked around campus to see what tasks I may find challenging with this new perspective. Climbing up smaller curbs and steps was challenging as I felt front heavy, and the slopes were a lot easier to traverse. Bending forward and leaning side to side or backwards was almost impossible as I felt that I would quickly lose my balance. After experimenting with the accessibility of campus, I tried to hold and use my hand whilst having a restrictive glove on. This replicated the feel of arthritis and how hard it would be moving fingers when they are almost bound straight, or even held outwards. Picking up jugs and holding glasses by the handles were very challenging as I was very restricted on the bend of my fingers, and such had to find alternative ways of picking up the items which were more like cupping them and lifting them that way.
The second section of the workshop consisted of using visual impairment glasses to test the different visionary obstructions. Again testing these around campus, some of the visual impairment glasses made it very hard to read signs at a distance, however, some of the visual impairment pieces such as the cataract glasses made it incredibly hard to read a leaflet that was in my hand. Designing for situations like this is very challenging and requires a lot of consideration as not one solution solves all in circumstances like these.
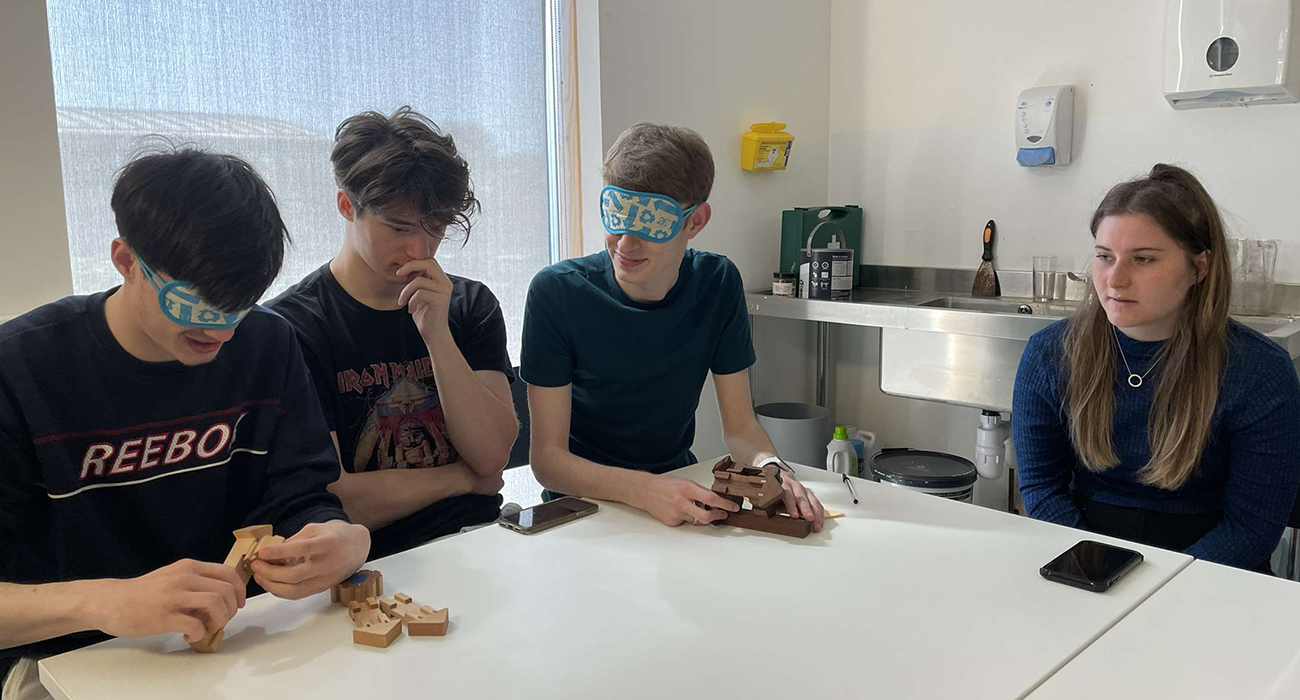
The third part of the empathy workshop was a team working exercise. This was done in pairs and blindfolded, where one person would feel the pieces in front of them and create an object with the varying pieces that have some textured signifiers. The other person’s job is to recreate this object based on the descriptions given by the creator of the object and the sensory indicators that were on the pieces themselves. This was a challenging task as the descriptions could vary from person to person and what one person may think was the centre, another may not.
The final aspect of the empathy workshop was simulating what the old age movement was like and what it was like traversing around using a wheelchair. The old suit was compiled of weights and restrictive items of clothing, so the user found it hard to undergo basic tasks like walking, carrying something or even opening a door. The wheelchair experience was another way to test the universities inclusivity where specific places like the arts bar was especially hard to move around due to the closely knit tables and chairs – although they did have easy elevator access.
Overall, I felt that the empathy workshop was eye opening and extremely informative to the design decisions we will make throughout this project. Understanding what restrictions some people may have and knowing yourself what could help these issues are a great step to designing for increased inclusivity.
CODING NATURAL FORMS AND MARK-MAKING WORKSHOP
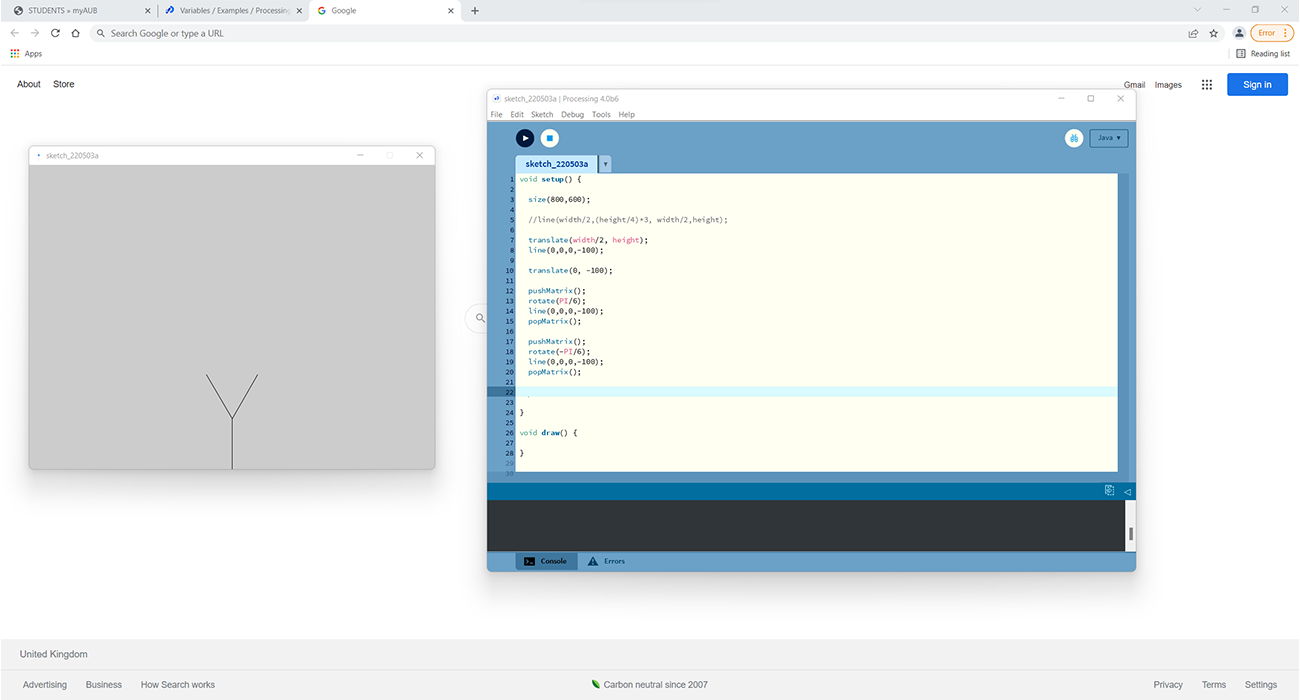
The workshop led by Mark was a coding workshop where I learnt how to code in the software ”Processing” and create a multiplying tree effect of random angles, colours and thicknesses. The Workshop began with a quick introduction to how to plot coordinates within the software and create a line based on the position of 2 different points. Shortly after I learned how to translate the graph coordinates (which I was familiar with due to studying this at a-levels) and create extra strands coming off the original tree. This concept was the basics for creating a repeating and randomly generating branch system for the rest of the tree.
The code to create was based on another set of equations, where the branches would be placed at a random angle between, and only be a fraction of the original length. This would then be repeated until the branch length was of a certain size, of which the process would stop and not infinitely replicate and cause a computer malfunction.
Once the randomly generated tree was in place, it was a matter of adding a randomising colour aspect to the generation. The colour of the tree would vary depending on the angle the original branches would come off at and then rotate between all colours on the colour wheel. This then layered upon one another created a very psychedelic effect of tree forms in unique colours.
After the repeating colours and sizing was placed, I played around with having an adaptive thickness of the tree. Simply mapping the X coordinates of the mouse would allow a value to be placed, this alongside a variable like the stroke thickness, allowed the x-axis position of the mouse to control the thickness of the next tree generated.
I found this process of creating natural forms in an entirely digital way to be a unique and strange way of working. The randomness of each generated tree was true to the real-world growth of flora where it is totally unpredictable but still created within limitations. Reflecting the real-world in digital format is very inspiring to the project and allows the process of creating to truly take influence from the core values that could be extracted from the question relating to the world around us.
Move your mouse left and right to change the angle of the tree branches. Press ‘d’ to start and stop drawing the trees. Press ‘c’ to clear the frame. Press ‘s’ to save the current frame.
E-TEXTILES WORKSHOP
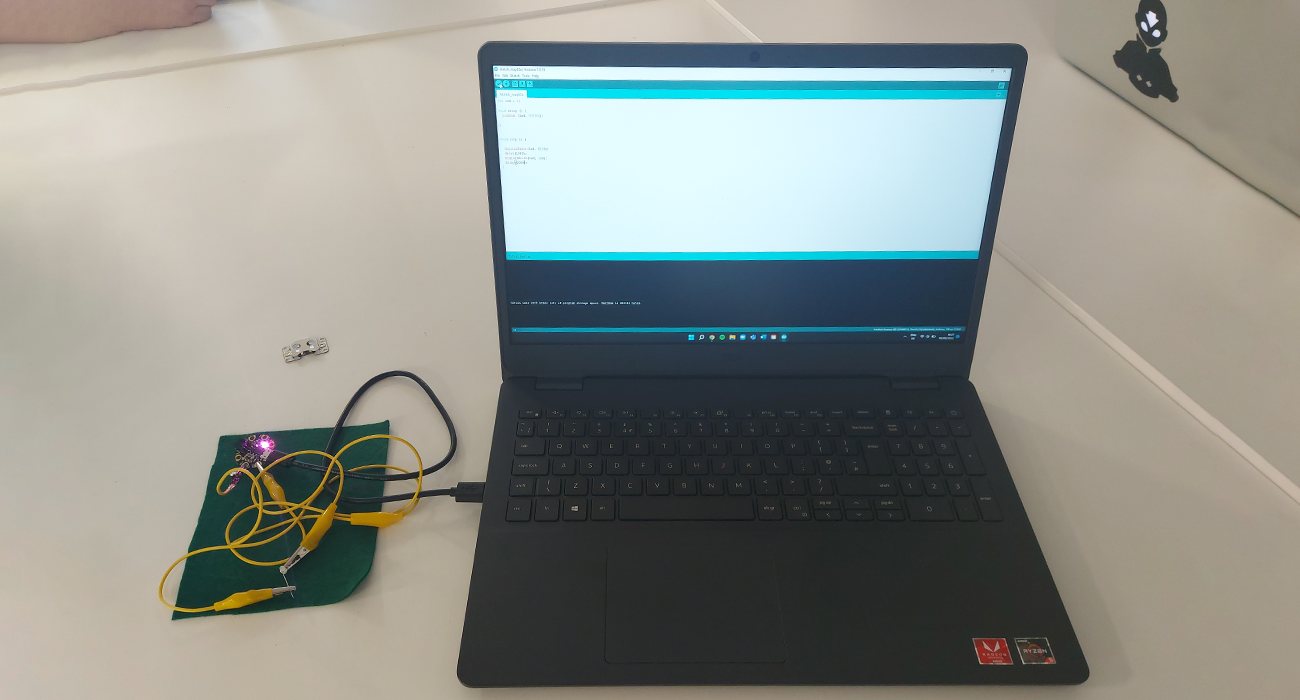
Emilie’s E-textile workshop was a great introduction to using multiple mediums to create unique pieces that would not regularly be made with one another. The start of the workshop was an explanation to all the textiles and the fundamentals behind the equipment we would be using, that being: a miniature computer board, lights, crocodile clips, felt and silver-coated thread.
The software we used to code the board was called Arduino where I learnt how to set up specific voltages to the board, starting at high, then adding a delay to the current then reducing the voltage to low. This was all included within a line of code to create a loop that made the light blink. After configuring the boards name and the port to my computer, I uploaded the specified code to the board, and such would blink once it had power.
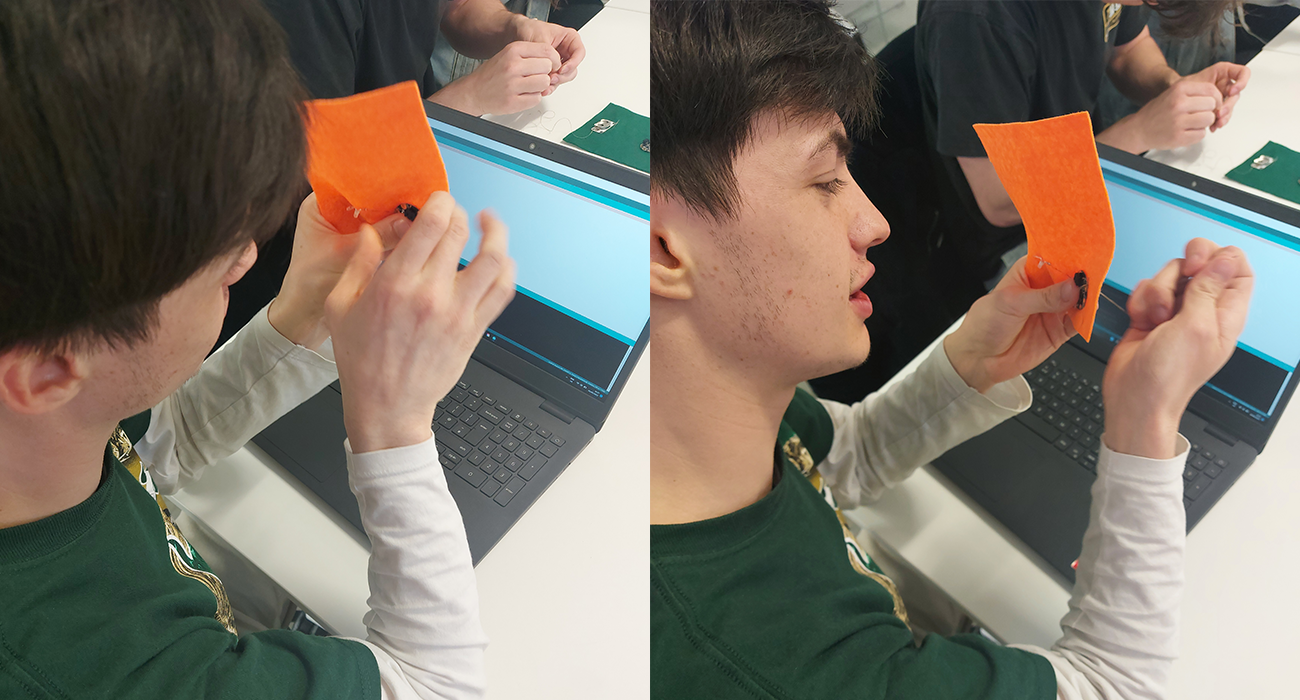
After coding the board was completed, it was about constructing the complete circuit. I initially trialled it with crocodile clips and the battery pack, but then moved onto the felt sheet and conductive thread. The felt was used as a base to hold all the components together (like a circuit board) and then we used the thread to close the circuit. I then used the conductive thread to sew the pieces down with multiple passes to keep a secure connection and connected the negative on the light and battery pack to the ground on the board, then the positive on the light and battery to the 3V section on the board.
Creating something like this was a great experience in how there are many ways people can create, not just the traditional pen on paper or typed up on a computer. The blend of coding and physical materials was a fun experience for me. I really enjoy coding and know I wanted to introduce a more physical way of working into my design process.
CINEMA 4D WORKSHOP
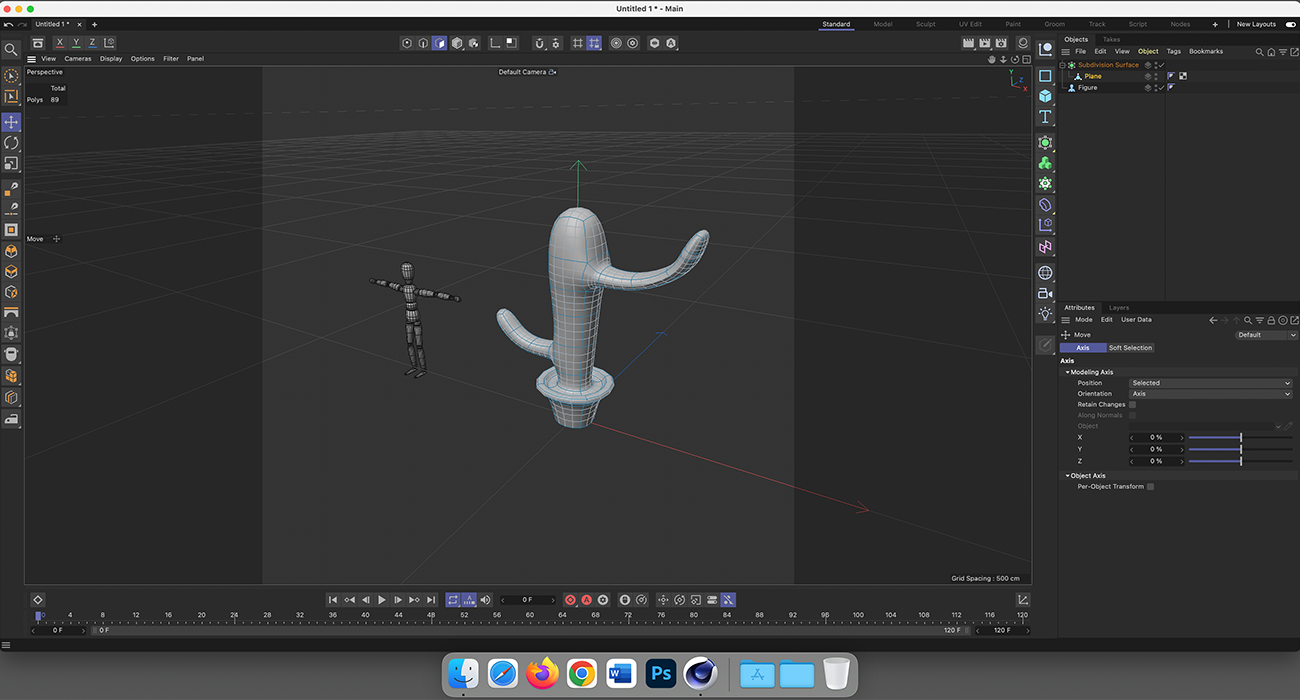
The cinema 4D workshop was an introduction to the software. It was a basic rundown of all the features that you could use some of the manipulation devices and how to do a basic animation within the programme.
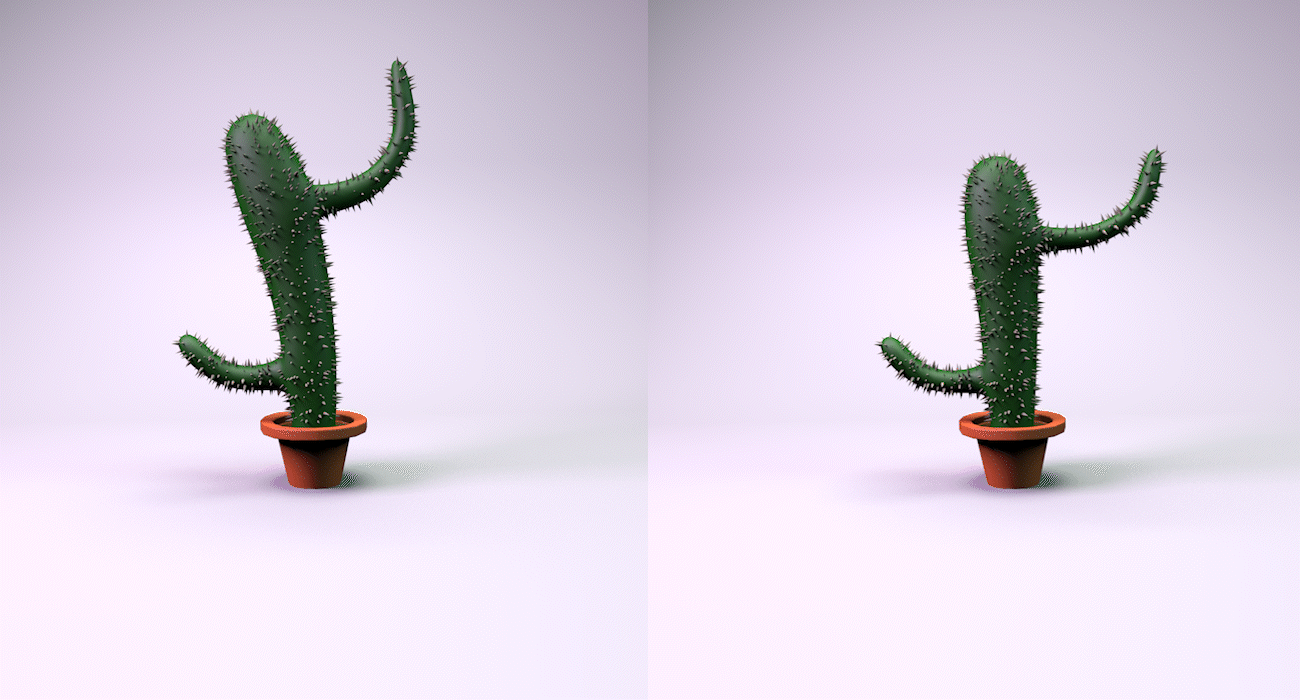
The start of the workshop was an explanation of how edges, corners and plains work and how to extrude them into a simple box. this box can then be manipulated at an angle to create a tapered edge, and we did such to create a slanted plant pot style box. Once we had the box and the rim of the pot, we then started to taper out a cactus of which mine was rather chunky.
After understanding the basic Polygon shape, we could then smooth out the surfaces and edges until we had something a bit more representative of a cactus. This was using the subdivision surface group to allow the software to create the smooth calculations itself.
After we had placed the spikes upon the cactus, we then started playing around with the camera and lights to try and create an artistic still life. Understanding this was rather simple due to my prior experience in photography and lighting, and this just applied the same way but in a digital format.
After we had placed the spikes upon the cactus, we then started playing around with the camera and lights to try and create an artistic still life. Understanding this was rather simple due to my prior experience in photography and lighting, and this just applied the same way but in a digital format.
Once we were happy with the setup, we started playing with some modifiers to allow the object to be distorted in different ways. The cactus was going to bend left and right to imitate it jiggling or waving. this was then animated using keyframes within cinema 4D which is very similar to adobe software like After Effects and Premiere Pro, which I am very confident in.
To finalise my introduction to Cinema 4D, I implemented some type to test out the 3D aspect of typography within the software. After understanding how to move it on each axis, curving the edges, but also applying different textures and materials to the type.
Overall, I was very impressed with the capabilities of cinema 4D and wish to continue my experimentation within the software to hopefully create something a bit more substantial than a simple cactus.
CODE, NATURE AND PHYSICAL FORMS WORKSHOP
The Code, Nature, and Physical Forms Workshop was an extension to the original workshop hosted by mark about coding with influence of the natural world. We again used processing to achieve what we wanted along with Arduino and physical computer engineering.
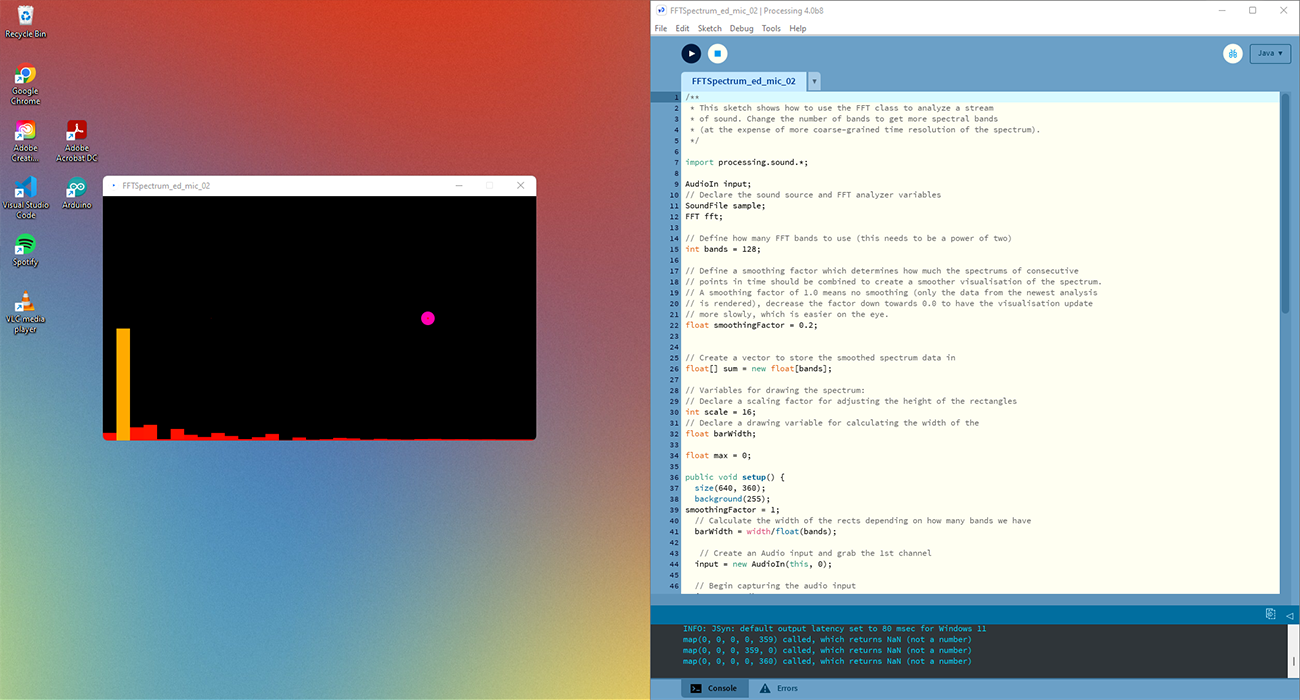
After a brief recap of what we did in the prior session, we investigated sound within processing and how the microphone input could affect the output on screen. We started with a simple visualisation of pink bars on a green background fluctuated depending on the amount of sound in the room around my laptop’s microphone.
After investigating the charts code, we changed the background colour, bar colour and bar width of the diagram to something more unique. This was to a rainbow effect which was ever-changing throughout the life span of the bars on screen. We also played around with a circular visualisation which would expand from the centre outwards depending on the amount of audio input my laptop had
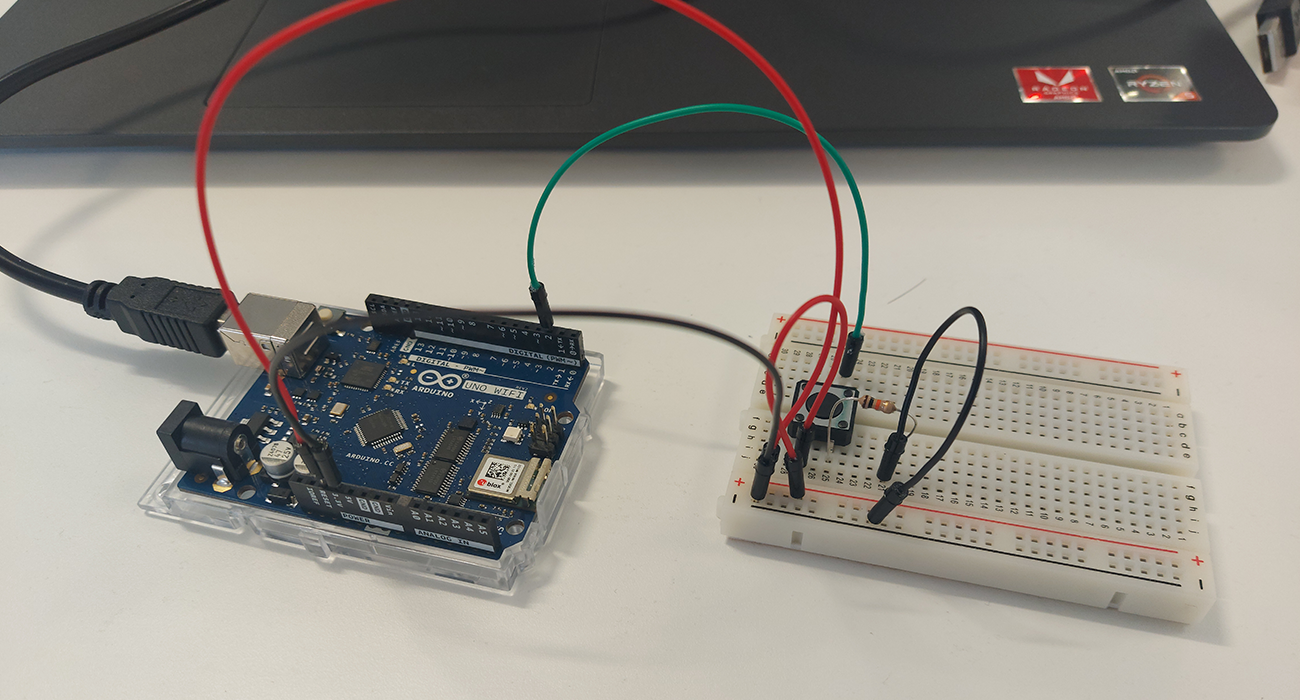
After playing around with audio, we created an Arduino board hooked up to a breadboard which would detect light and give us a digital output based upon the amount given from the analogue receiver. The circuit was rather simple to build and connecting the Arduino to my laptop was a simple process as I did this prior in the E-textiles workshop.
Once the board was connected to my laptop and Arduino had the right code within processing, there was a visual number to identify how much light the centre was getting from the board and would fluctuate depending on how much light I gave it. I tested this by shining my phone torch upon it and then number would peak to about 1024, or placing it under the table where it would receive almost no light would drop down to about 20.
This workshop was very beneficial to helping me understand how you can bridge the gap between a physical receiver to a digital output and vice versa, crossing the bridge between analogue and digital.
AR DIGITAL WORKSHOP
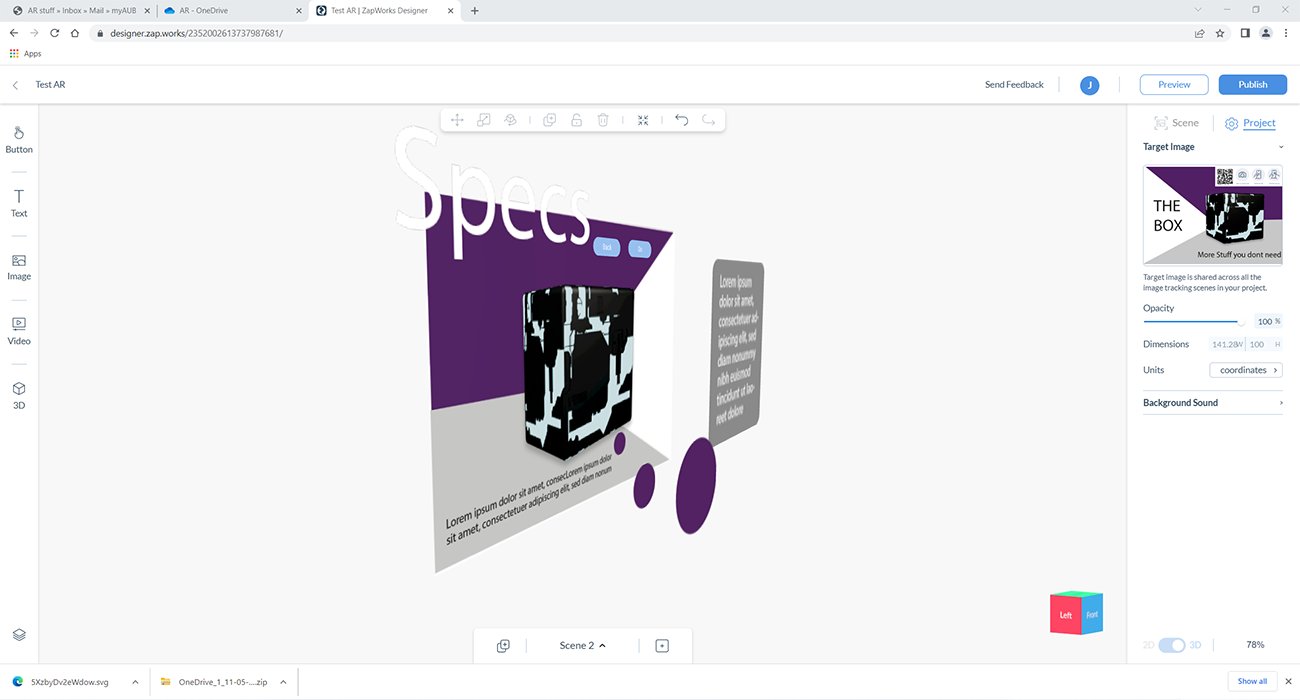
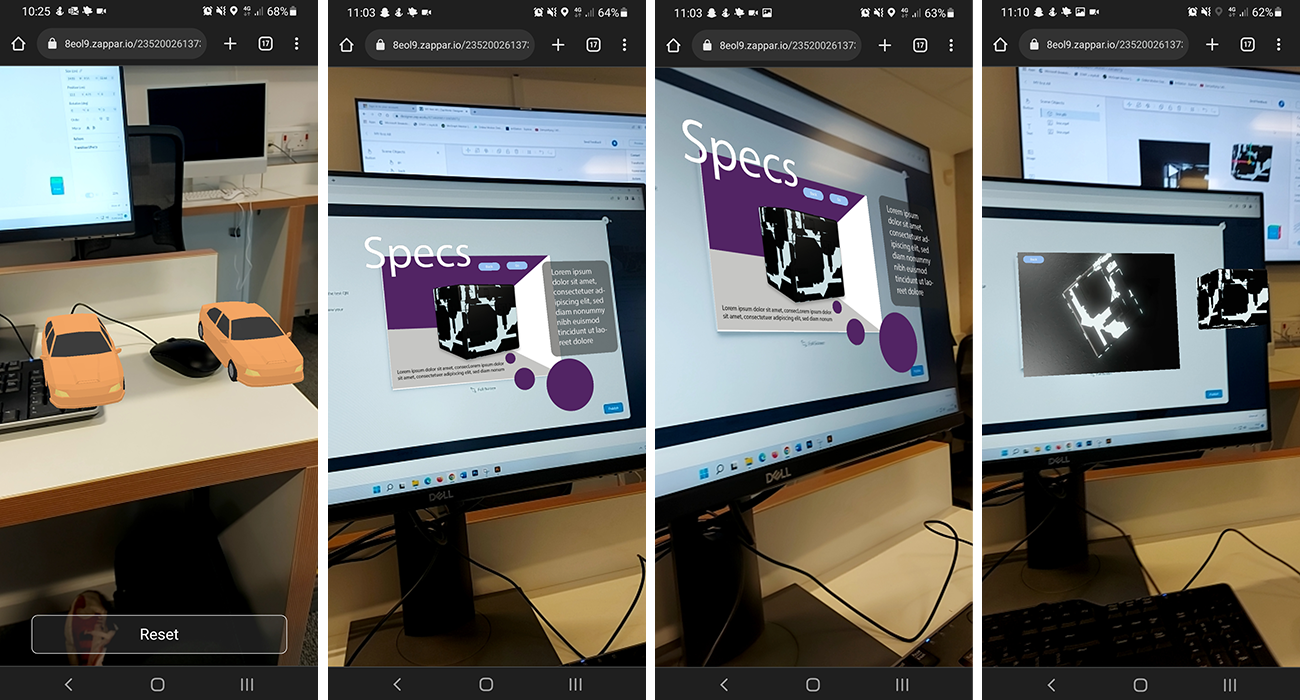
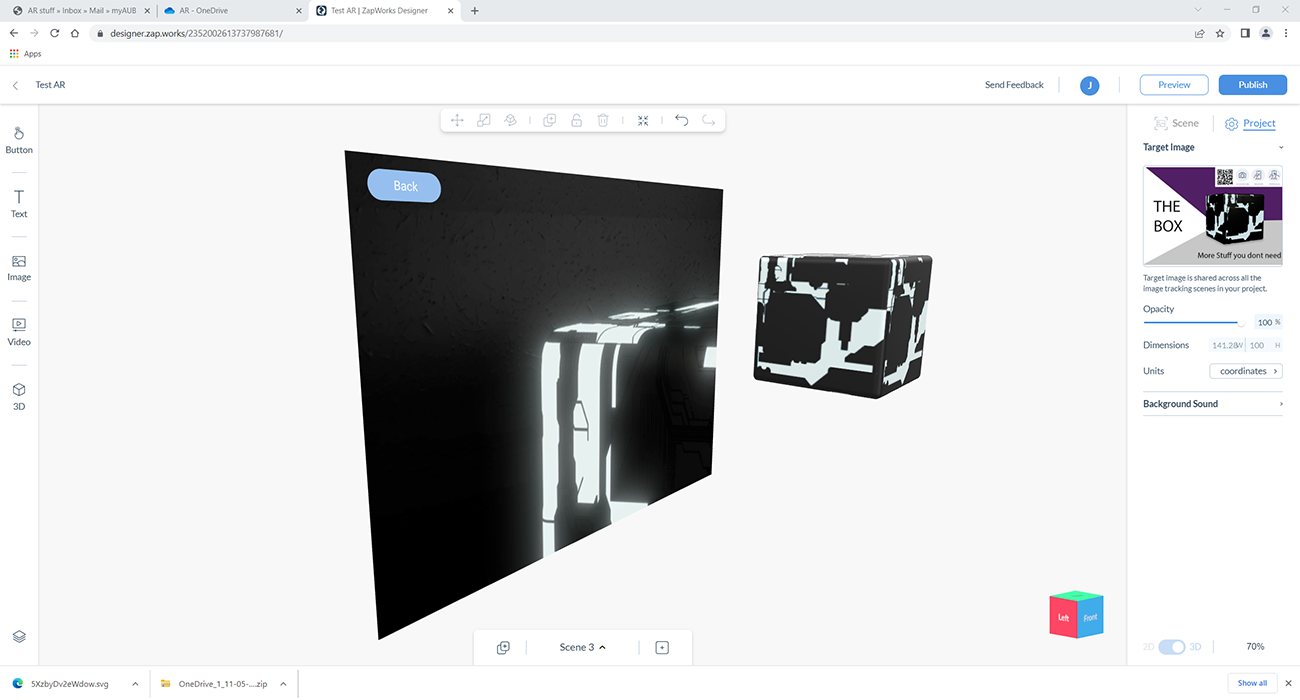
The start of the AR workshop showed me that there are two basic applications for getting into AR. The first is called Artvive which requires the user to download an additional app, and the second is called Zappworks which does not require the user to download additional software but uses the internet and the browser services to create the augmented effect.
In the session, I learned how to use Zappworks and how to create my own piece which I could view on my own phone. I started by creating a simple diorama of the pre-set car registering to a pre-made Zappworks QR code which I placed on the desk in front of me. After making this simple scene I moved on to using assets provided to us by Ben, which consisted of a few background elements a 3D cube and some body text. I re-positioned this content at different layers so that when we scanned the code, the assets would appear at different levels and would be 3D in the space around us.
This was a unique way of creating a 3D version of a 2D object and could be a great device to be used in our design for Green Space Dark Skies. There’s potential to include 3D designs or even a greater body of text in this space given by AR.